
Curățarea covoarelor poate părea simplă, dar detaliile sunt cele care contează cu adevărat. Chiar și cu mașinile moderne și aspiratoarele de top, alegerea unei soluții de curățare greșite poate deteriora covorul și îi poate anula garanția instantaneu . Majoritatea oamenilor cred că frecarea mai intensă este soluția, dar se pare că o pregătire simplă și o metodă atentă vă oferă rezultate mai curate și vă protejează investiția pe termen lung.
Cuprins
- Pasul 1: Adunați-vă consumabilele și uneltele de curățenie
- Pasul 2: Testați rezistența culorii pe o zonă ascunsă
- Pasul 3: Aspirați bine pentru a îndepărta murdăria și resturile
- Pasul 4: Îndepărtați petele cu soluții de curățare adecvate
- Pasul 5: Curățare profundă folosind un aparat de curățat covoare sau un aparat de curățat cu abur
- Pasul 6: Lăsați covorul să se usuce și verificați dacă este curățat
Rezumat rapid
| Punct cheie | Explicaţie |
|---|---|
| 1. Adună produsele esențiale de curățenie | Organizați unelte specializate în funcție de tipul de covor pentru rezultate eficiente de curățare. |
| 2. Testați rezistența culorii cu soluția de curățare | Verificați întotdeauna dacă există schimbări de culoare într-un loc ascuns pentru a evita deteriorarea permanentă a covorului. |
| 3. Aspirați bine înainte de curățare | Aspirarea completă îndepărtează murdăria și resturile, prevenind încrustarea ulterioară în timpul curățării. |
| 4. Tratați petele imediat cu metode adecvate | Tratați prompt diferitele tipuri de pete folosind metode adaptate originii lor pentru a asigura îndepărtarea eficientă. |
| 5. Acordați suficient timp de uscare după curățare | Asigurați uscarea completă prin îmbunătățirea circulației aerului, prevenirea mucegaiului și menținerea aspectului covorului. |
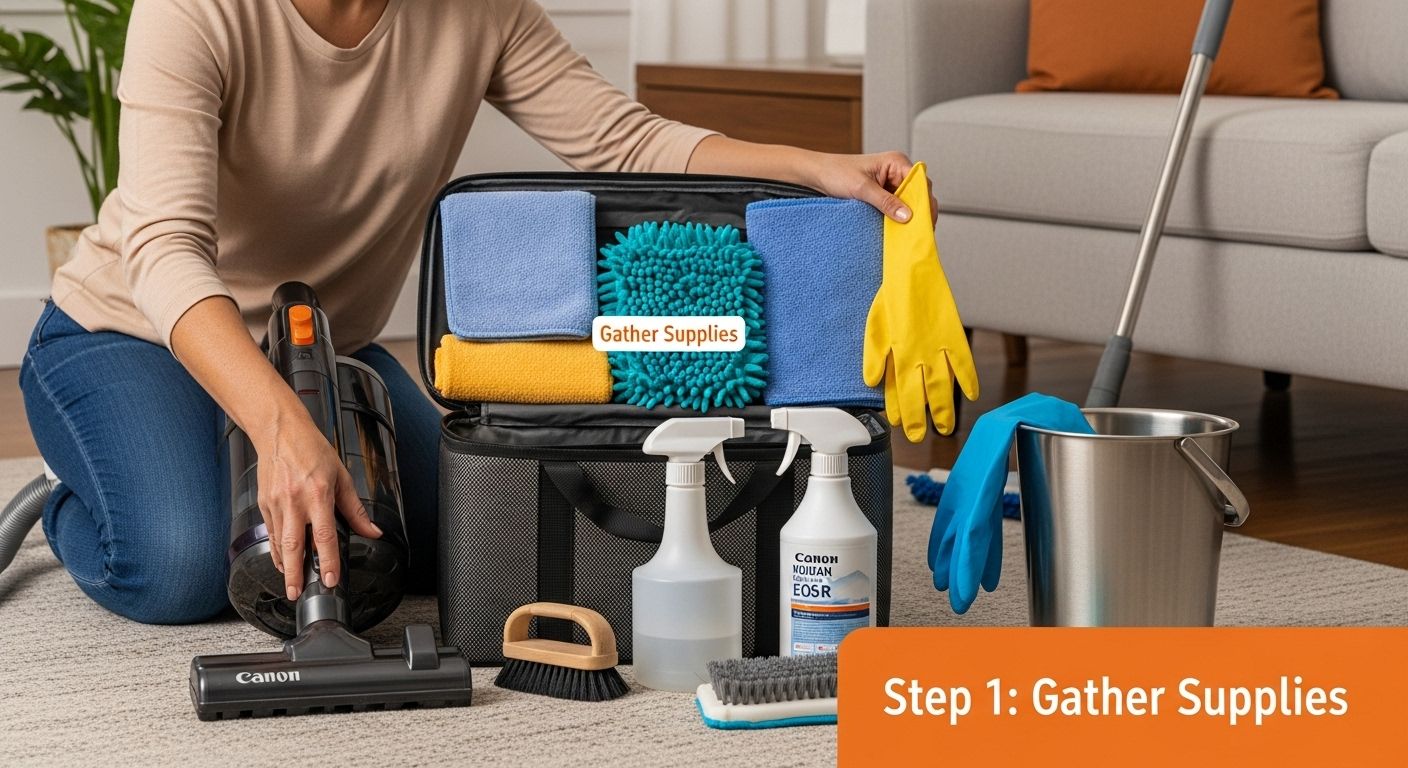
Pasul 1: Adunați-vă consumabilele și uneltele de curățenie
Curățarea reușită a covoarelor începe cu o pregătire strategică și echipamentul potrivit. Înainte de a te apuca de procesul de curățare, asamblarea unui set complet de instrumente vă va eficientiza eforturile și va asigura rezultate mai eficiente. Întreținerea profesională a covoarelor necesită selectarea arsenalului de curățare adecvat, care să corespundă tipului specific de covor și provocărilor de curățare .
Your essential carpet cleaning toolkit should include a range of specialized items designed to tackle different aspects of carpet maintenance. Start by selecting a high-quality vacuum cleaner specifically rated for your carpet’s material. The Carpet and Rug Institute recommends using vacuums with strong suction and adjustable height settings to prevent damage while effectively removing embedded dirt.
Next, gather cleaning solutions tailored to your carpet’s specific composition. Wool carpets require gentler treatments compared to synthetic fibers, so understanding your carpet’s material is crucial. Your toolkit should include:
- Carpet-specific cleaning solution matching your carpet type
- White microfiber cloths for blotting and spot cleaning
- Soft bristle brush for gentle agitation
- Spray bottle for precise solution application
- Protective gloves to shield your hands
- Clean white towels for drying
Consider investing in a carpet cleaning machine or steam cleaner for deeper, more thorough cleaning. These tools provide more intensive treatment than standard spot cleaning methods. When selecting cleaning solutions, prioritize products that are environmentally friendly and certified by recognized organizations, which indicates lower chemical impact and higher effectiveness.
Preparing your workspace is equally important. Clear the area of furniture, remove small objects, and ensure good ventilation before beginning. Having all your tools organized and within reach will make the cleaning process smoother and more efficient. By methodically gathering the right supplies, you set the foundation for a successful carpet cleaning experience that preserves your carpet’s appearance and extends its lifespan.
Below is a quick-reference table summarizing the required carpet cleaning tools and supplies, their specific uses, and special considerations for different carpet types.
| Tool/Supply | Purpose/Use | Special Considerations |
|---|---|---|
| High-quality vacuum cleaner | Remove dirt and debris | Use type and setting appropriate for carpet |
| Carpet-specific cleaning solution | Lift spots and stains | Match to carpet material (wool, synthetic) |
| White microfiber cloths | Blot and spot clean | Prevent color transfer |
| Soft bristle brush | Agitate stains gently | Avoid harsh scrubbing |
| Spray bottle | Precise solution application | Allows controlled, even coverage |
| Protective gloves | Protect hands from chemicals | Choose chemical-resistant material |
| Clean white towels | Blot dry and remove moisture | Use only clean, white towels |
| Carpet cleaning machine/steam cleaner | Deep cleaning and extraction | Ensure compatibility with your carpet |
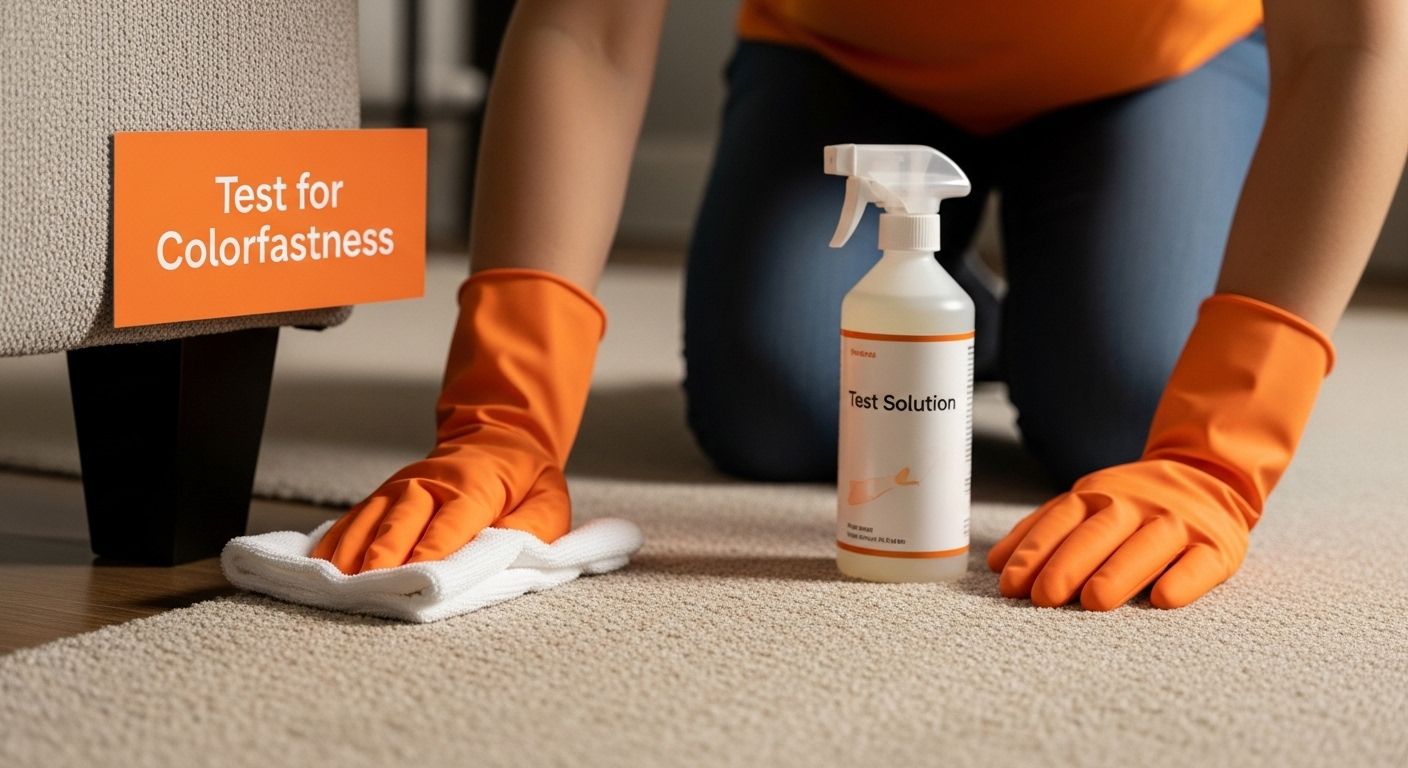
Step 2: Test for Colorfastness on a Hidden Area
Before applying any cleaning solution across your entire carpet, testing for colorfastness is a critical step that prevents potential permanent damage. This precautionary measure helps you understand how your carpet will react to specific cleaning products, ensuring you don’t accidentally discolor or destroy your valuable floor covering.
Select an inconspicuous area for testing, such as inside a closet, beneath furniture, or in a corner that remains consistently hidden. These locations allow you to conduct your test without risking visible damage to prominent carpet areas. The Manufacturing Solutions Center recommends choosing a spot that represents the carpet’s overall material and color composition.
Prepare a small amount of your chosen cleaning solution and apply it to a clean white cloth. Gently dab the hidden carpet area, applying minimal pressure to avoid saturating the fibers. Watch carefully for any color transfer or immediate changes in the carpet’s appearance. Pay close attention to potential signs of color bleeding, fading, or texture alteration.
Wait approximately 15 to 20 minutes after application and inspect the test area thoroughly. Look for these critical indicators:
- No color change or transfer to the white cloth
- Consistent carpet texture and appearance
- No visible signs of damage or discoloration
- Carpet fibers remain intact and undistorted
If you notice any negative reactions during your test, immediately discontinue use of that specific cleaning solution. Alternative products or professional cleaning services might be necessary to safely address your carpet’s unique characteristics. Some carpet materials, particularly those with delicate or vintage fibers, may require specialized treatment that standard home cleaning solutions cannot provide.
Successful colorfastness testing gives you confidence to proceed with your cleaning process, knowing you’ve minimized the risk of accidental damage. This careful approach demonstrates responsible carpet maintenance and protects your investment in quality floor coverings.
Step 3: Vacuum Thoroughly to Remove Dirt and Debris
Effective carpet cleaning begins with comprehensive vacuuming, a critical step that removes loose dirt, dust, and debris before applying any cleaning solutions. This preparatory process prevents potentially damaging particles from becoming embedded deeper into carpet fibers during subsequent cleaning stages.
Purdue University Extension recommends a systematic approach to thorough vacuuming. Start by clearing the room of smaller objects and moving lightweight furniture to access entire carpet surfaces. Adjust your vacuum’s height setting to match your carpet’s pile thickness, ensuring optimal suction and contact with embedded dirt.
Strategic vacuuming requires more than just a quick pass over the surface. Methodically move the vacuum in multiple directions, overlapping your passes to capture dirt from different angles. Professional cleaners suggest moving the vacuum slowly and deliberately, allowing sufficient time for the machine to extract particles from deep within carpet fibers. For high-traffic areas, spend extra time going back and forth six to eight times, creating a crosshatch pattern that ensures maximum dirt removal.
Pay special attention to often-overlooked areas where dirt accumulates most rapidly:
- Along baseboards and wall edges
- Underneath furniture and hard-to-reach corners
- Areas near entryways and hallways
- Spaces around and under heavy furniture
Utilize your vacuum’s specialized attachments to reach challenging spots. Crevice tools work excellently for tight spaces, while upholstery attachments help clean edges and remove surface-level debris. Consider using a vacuum with HEPA filtration to trap the smallest dust particles and improve overall indoor air quality during the cleaning process.
Verify the effectiveness of your vacuuming by checking your vacuum’s dust collection container and examining the carpet surface. A clean collection container and visibly refreshed carpet texture indicate you’ve successfully completed this crucial preparatory step.
Remember, thorough vacuuming not only prepares your carpet for deeper cleaning but also extends the overall life and appearance of your flooring.
Step 4: Address Stains with Appropriate Cleaning Solutions
Stain removal requires a strategic and gentle approach to prevent permanent carpet damage. Different types of stains demand specific treatment methods, making it crucial to identify the stain’s origin and select an appropriate cleaning solution. Quick and precise action can mean the difference between a temporary blemish and a lasting carpet imperfection.
The University of Illinois Extension recommends addressing spills immediately to prevent deeper penetration into carpet fibers. Begin by identifying the stain type - whether water-based like coffee or wine, or oil-based such as grease or makeup. Always work from the stain’s outer edges toward the center to prevent spreading, using a clean white cloth or paper towel to blot, never rub, which can damage carpet fibers and push the stain deeper.
For water-based stains, prepare a gentle cleaning solution using mild dish soap and warm water. Mix a small amount of clear, unscented dish soap with warm water, creating a solution that can effectively lift the stain without causing additional damage. Test the solution on a hidden carpet area first to ensure color compatibility and prevent potential discoloration.
Oil-based and more stubborn stains require specialized approaches:
- Use a specialized carpet cleaning solvent for grease-based stains
- Apply white vinegar for organic stains like food or wine
- Use hydrogen peroxide for light-colored carpets with tough stains
- Consider enzyme-based cleaners for protein-based spills
Patience is key during stain removal. Apply your chosen cleaning solution sparingly, allowing it to sit briefly before gently blotting with a clean white cloth. Repeat the process multiple times if necessary, always using a fresh section of the cloth to prevent redepositing the stain. After treatment, rinse the area with clean water and blot dry with a fresh towel to remove any remaining cleaning solution.
The following table outlines common types of carpet stains referenced in the article, recommended cleaning solutions, and important notes to keep in mind for each situation.
| Stain Type | Recommended Solution | Key Notes |
|---|---|---|
| Water-based | Mild dish soap & warm water | Blot, don't rub; test for colorfastness first |
| Oil-based | Specialized carpet cleaning solvent | Work from edge to center; may require multiple treatments |
| Organic (food, wine) | White vinegar | Use sparingly; always blot, never rub |
| Protein-based | Enzyme-based cleaner | Apply per manufacturer's directions; good for pet accidents |
| Light carpets & tough stains | Hydrogen peroxide | Use only on light-colored carpets; always pre-test in hidden area |
| Grease | Specialized solvent | Act quickly before it sets; avoid oversaturating carpet fibers |
Successful stain removal is evident when the affected area looks clean, uniform in color, and matches the surrounding carpet texture. If a stain persists after multiple attempts, consider consulting a professional carpet cleaning service to prevent potential permanent damage.
Step 5: Deep Clean Using a Carpet Cleaner or Steam Cleaner
Deep cleaning transforms your carpet from simply clean to truly refreshed, removing deeply embedded dirt, allergens, and stubborn grime that regular vacuuming cannot eliminate. This critical step revitalizes your carpet’s appearance and extends its overall lifespan by thoroughly extracting accumulated contaminants from deep within the fibers.
PubMed research highlights the significant benefits of professional-grade cleaning methods, demonstrating how steam and hot water extraction can dramatically reduce household allergens and dust mite populations. Before beginning, carefully read your carpet cleaner’s instruction manual and select the appropriate cleaning solution compatible with your specific carpet material.
Preparation is key to successful deep cleaning. Start by filling your carpet cleaner’s reservoir with the recommended water temperature and cleaning solution. Most machines work best with warm water, which helps dissolve dirt more effectively. Begin in the farthest corner of the room, working systematically toward the exit to avoid walking on newly cleaned areas. Move the machine slowly and deliberately, allowing sufficient time for the cleaning solution to penetrate and the machine to extract dirty water.
Apply cleaning techniques that maximize effectiveness:
- Overlap cleaning passes to ensure complete coverage
- Maintain consistent machine speed for uniform cleaning
- Use multiple slow passes for heavily soiled areas
- Keep cleaning solution and water reservoirs clean
- Empty and rinse dirty water containers frequently
When using a steam cleaner, maintain a steady, slow movement to allow heat and moisture to penetrate carpet fibers thoroughly. Be cautious not to oversaturate the carpet, as excessive moisture can lead to mold growth or damage underlying flooring. Most carpet cleaning machines have adjustable settings for different carpet types, so select the appropriate mode for your specific flooring.
Successful deep cleaning is evident through clear indicators: significantly improved carpet color, reduced odors, and visibly cleaner water in the machine’s extraction tank. Allow the carpet to dry completely by increasing room ventilation, using fans, and avoiding foot traffic. Typically, carpets require 6 to 12 hours of drying time, depending on humidity and airflow conditions.
Step 6: Allow the Carpet to Dry and Check for Cleanliness
The final stage of carpet cleaning is just as crucial as the initial preparation, involving careful drying and thorough inspection to ensure optimal results. Proper drying prevents potential mold growth and allows you to assess the effectiveness of your cleaning efforts. Moisture management is key to maintaining your carpet’s long-term health and appearance.
Montana State University recommends creating an optimal drying environment immediately after cleaning. Begin by maximizing air circulation throughout the room. Open windows, activate ceiling fans, and position portable fans strategically to promote rapid and even drying. Point fans at the carpet from multiple angles, ensuring comprehensive air movement that accelerates moisture evaporation.
Establish a no-traffic zone during the drying process to prevent dirt redeposition and protect the carpet’s newly cleaned surface. Use temporary barriers or signs to remind family members and household occupants to avoid walking on the damp carpet. If possible, maintain room temperatures between 60 and 75 degrees Fahrenheit, which provides an ideal environment for efficient moisture evaporation.
Once the carpet appears dry, conduct a comprehensive cleanliness assessment:
- Check for any remaining stains or discolored patches
- Inspect carpet fibers for texture and uniformity
- Ensure no damp or musty odors persist
- Verify complete moisture removal by touching carpet surface
- Look for consistent color across cleaned areas
Carefully examine the carpet’s texture and appearance, running your hand across different sections to detect any remaining sticky residue or uneven areas. A truly clean carpet should feel soft, look refreshed, and have a consistent color and texture. If you notice any remaining dampness or detect a musty smell, continue air circulation and delay furniture replacement until the carpet is completely dry.
Complete drying typically takes between 6 to 24 hours, depending on humidity levels, air circulation, and cleaning method intensity. Patience during this final stage ensures your carpet remains in optimal condition, preventing potential moisture-related damage and preserving the deep-cleaning results you’ve worked hard to achieve.
Transform Your Carpet Cleaning Routine with Professional-Quality Tools
Are you tired of struggling with tough stains, lingering odors, or carpets that never seem completely clean, even after all your hard work? As you learned in our article, achieving spotless carpets means using the right equipment and techniques at every stage, from deep vacuuming to safe stain removal and thorough drying. Yet, using outdated or inefficient cleaning tools can quickly turn the process into a hassle and leave your results short of perfection.
Experience the difference with cleaning innovations designed just for you. Discover how our advanced selection of electric and manual mops, brushes, and cleaning accessories can help you reach a higher standard of cleanliness with less effort. Our products are made for modern households that want both convenience and a truly refreshed living space. Visit https://dreamramp.ro now to shop the right tools for every carpet challenge. Restore your peace of mind today and see how easy a spotless home can be when you have the best on your side.
Frequently Asked Questions
What cleaning supplies do I need for carpet cleaning?
You’ll need a high-quality vacuum cleaner, carpet-specific cleaning solutions, white microfiber cloths, a soft bristle brush, a spray bottle, protective gloves, and clean white towels. For deeper cleaning, consider a carpet cleaning machine or steam cleaner.
How do I test for colorfastness on my carpet?
To test for colorfastness, apply a small amount of your cleaning solution to a hidden area of your carpet using a clean white cloth. Check for any color transfer, discoloration, or damage after 15 to 20 minutes. If there are no negative reactions, it’s safe to use the solution on the rest of the carpet.
What is the best method for addressing stains on carpets?
Identificați tipul de pată (pe bază de apă sau pe bază de ulei) și folosiți soluții de curățare adecvate. Tamponați pata de la marginile exterioare spre centru și folosiți soluții precum detergent de vase blând pentru petele pe bază de apă sau solvenți specializați pentru petele pe bază de ulei. Ar putea fi necesare răbdare și încercări repetate pentru o îndepărtare eficientă a petelor.
Cât de des ar trebui să curăț covoarele în profunzime?
Curățarea profundă a covoarelor ar trebui efectuată la fiecare 12 până la 18 luni, în funcție de traficul pietonal și acumularea de murdărie. Aspirarea regulată ar trebui efectuată săptămânal pentru a preveni acumularea de murdărie și a prelungi durata de viață a covorului.


